Recently one of my friends excitedly told me, Alex, my cousin makes elaborate gingerbread houses every year, and guess what he’s making this year? The International Space Station! That idea instantly struck me as a tempting project. Over the last week, I finally got around to it.
First, like any normal human, I googled it to see what had been done before. I found two examples on google images.


Now, both of these are wonderful, but if you know me, then you’ll know that one thing I really appreciate is accuracy. So I decided that I’d do my best to make my model to scale.
The next step was to ask myself, what are the main, essential components of the station? I’d say there are three; the pressurized modules, the solar arrays, and the truss that connects them all. The solar arrays are easy, just flat rectangle. The truss is a long beam with a trapezoidal cross section. Challenging, but could be done with four long thin slices of gingerbread. Lastly, there’re the pressurized modules.
This part of the station gets the most attention by far, since it’s where the people are. It is the core of the station, both structurally and in terms of purpose. The rest of it feels like infrastructure, like all the pipes in your basement (although there are a number of scientific experiments attached to the truss). It was also least obvious how to model this part. It’s mostly a bunch of cylinders. I can imagine making a cylinder of gingerbread, but the radius would have to be awfully big. I realized that this feature would probably dictate the scale of the rest of the model, so I decided to do a circuit through the local grocery store to take an inventory of what cylindrical desserts would be appropriate. There were lots of possibilities, but nothing was particularly satisfying. I was originally hoping to use Little Debbie’s swiss rolls, but those proved both hard to find, and a little too big.
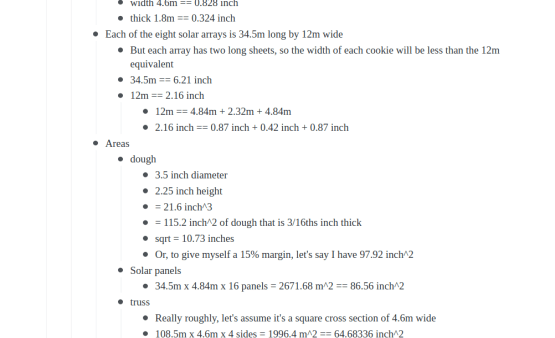
I took some time to figure out what a given module radius would imply about the physical sizes about the rest of the model. It was tempting to make a meter-long station, but I didn’t think I had the gingerbread or table space for it. I eventually decided that a 0.75 inch diameter for the modules would just about max out the pre-made dough I had bought, while making everything else workable. After one more store visit, I found these Waffeletten desserts.

This gave me a scaling factor of 0.18 inches per meter, or 1:219. (For comparison, this popular LEGO Saturn V kit is 1:110.)
I decided then that it was worth running a quick series of experiments in baking the dough. Did I mention I’ve never made a gingerbread house before? I later realized that I’d also never made a model of the ISS before. So this was a nice first.
Anyway, I took a scoop of the dough, put it on some parchment paper, and drew a circle around it with a pencil to see how much it would expand. I also wrapped some dough around a metal chopstick, just to see if that would make a nice crisp cylinder of dough. It did not.

I also used this opportunity to try cutting the dough, before baking, after baking, and after it had time to cool down. It was feasible to cut in all cases, as long as I was a bit careful with the edges. I also found that the dough expanded by 25%. Later I would learn that this did not replicate with larger amounts. Science is hard.
After baking and cutting all sixteen solar panels, I began to seriously question whether I could practically make the truss out of gingerbread. Some parts of it would be thinner, it would need to be glued together with icing, and I was concerned about running out of dough. Another friend mentioned that I could use Toblerone chocolate bars for it. They turned out to be the perfect size for my chosen scale. I decided to trim the pointy top off all the segments, to bring it closer to the trapezoidal shape.
I was pleased to find that there is edible, metallic paint, readily available off amazon. This gave the station a little pizzazz, making it look more suggestive of the real thing. I opted not to paint all surfaces though, partly because I didn’t know how far the paint would go (it turned out to need two coats) and partly because I still wanted my model to be obviously food.

While making decisions I tried to choose a compromise between three features: an accurate model, something that was in the gingerbread house spirit, and something that cohered as a food pallet. There were candies that would have made some of the detailing easier, but didn’t seem like they would taste good next to gingerbread. The only parts I ended up with that were not edible were the toothpicks, paperclips and paper.
While waiting for things to dry, bake, or cool, I decided to create the mat to display it on. I got a surprising amount of pleasure out of making this part. Originally I just thought I’d use a plain piece of cardboard, and then I realized that it would be easy to make it look like the earth was below the station. I looked around for easy ways to get satellite images of the earth, and screen-shotting google maps turned out to be the easiest way. So I zoomed into the Bay area (where I live), turned on satellite mode, turned of labels, put it in full screen, and took a screen shot. The I panned as far away as I though my margins would handle, and took another screenshot, and so on. Then I cropped the menu stuff from these photos, printed them out, cut the white paper margins off, and aligned them, taped them together, taped the whole thing to the cardboard, and then covered it in plastic wrap.

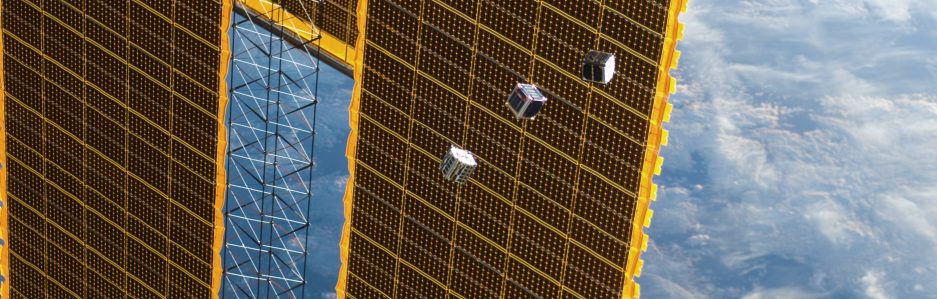
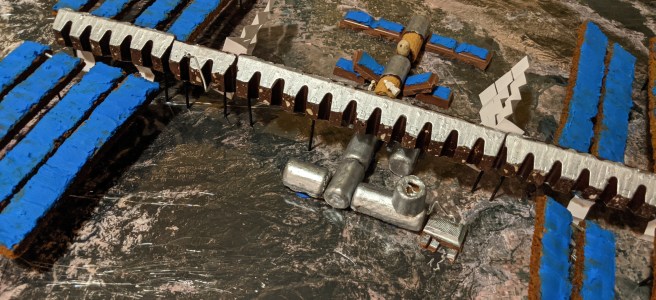
Here’s the section where I want to brag about the accuracies, because if I was reading this post I would want to know all about it. (After that I’ll talk about the inaccuracies.) First, all the basic sizes are proportional: the length of the truss, the height and shape of the truss, the length and width of the solar panels, the fact that they’re paired up, the spacing between them, the spacing between the pairs, their distance from and along the truss, the diameter and length of the pressurized modules, their relative locations, the fact that Zarya has its solar panels folded up to make way for the thermal radiators, the width, length and number of panels of the thermal radiators. I’m also pleased to have included the existence of the Poisk docking module, the Bigelow Expandable Activity Module, the Canadarm, the Kibo Exposed Facility, and the Kibo Remote Manipulator System. I set some of the solar arrays at an angle, because in pictures of the station they never seem to all be at the same angle, and I angled the thermal radiators perpendicularly. Finally, the mat depicts the SF Bay area and a hundred miles east of it; relative to this, the ISS is positioned going in the right cardinal direction (but at not quite the right angle).


Okay, now for the inaccuracies. The Quest Airlock is completely missing, because honestly it’s just such a weird shape that I didn’t know what to do. The most egregious depiction is the truss. I treated it like a homogeneous linear shape, whereas in reality its made of as many distinct segments as the pressurized section. The parts that hold the solar arrays aren’t even trapezoidal. None of the intricate machinery is represented (except the Canadarm). Next are the Russian components Zarya and Zvezda. I gave these a try, but they’re also a really irregular shape, so I only got a bit of it. They should also be painted white, but I didn’t want to buy two bottles of edible paint.


There are a number of components that aren’t present simply because they would be located below the plane that I rested the model on. These are the Pirs and Rassvet Russian modules (which are smaller than most of the others, but still notable), the cupola, and the other four panels of each of the smaller thermal radiator arrays that point downward. There are some missing external platforms and experiments like the Alpha Magnetic Spectrometer. There are no docked spacecraft, resupply capsules, or adapters.
Overall this project was really fun! I was surprised by how much I enjoyed trying to replicate features of the station. I was also surprised at how much time things took, and how many decision points there were that mattered. For example, I painted the toothpicks black as an afterthought, but now I realize that that made a big difference in how it looks. I’m very happy with the result, and I’m now more motivated to make more ISS models!
